For most Class A motorhomes, plan on a carport at least 14-foot wide, 40 to 45 feet long, and 14 to 16 feet of clear height. Class C rigs typically need 12 feet wide by 35 to 40 feet long with 12 to 13 feet of clearance, while travel trailers and fifth wheels usually fit a 12 to 14 foot width with length matched to the trailer plus 5 to 10 feet. Always add clearance for roof-mounted air conditioners or antennas, and confirm local permit and setback rules before you finalize any size.
TL;DR:
- A motorhome measuring 30 feet needs roughly 35 to 40 feet of carport length, including the recommended 5 to 10 foot allowance.
- Measure the highest roof accessory on site and add 12 to 24 inches; roof pitch, driveway slope, and leg height can reduce usable clearance.
- Extended slide outs may add 2 to 4 feet to required width, while bays 18 to 24 feet wide can accommodate storage or another vehicle.
- Confirm permit, setback, and height limits before ordering, because local rules can restrict the footprint or clearance even when you know your RV’s dimensions.
- Choose a vertical roof in snowy regions, and confirm local snow and wind ratings; framing spaced 4 feet apart adds support for taller structures.
Table of Contents
- Sizing by RV Class: Recommended Dimensions and Examples
- How Tall Should an RV Carport Be and How Do You Measure Clearance?
- Width, Length, and Maneuvering: Practical Layout Considerations
- Structural Considerations: Roof Style, Framing, and Load Ratings
- Permits, Codes, and Standards to Check Before You Build
- How to Measure Your RV Before Ordering or Building a Carport
- How Stoots Storage Solutions Approaches RV Carport Sizing
- Site Preparation and Ground Leveling for RV Carport Installation
- Common Materials Used for RV Carports and Their Durability
- Ventilation and Protection Features Specific to RV Carports
- Seasonal Considerations That Affect Carport Size and Design
- Installer Perspective: Common Sizing Mistakes and Quick Fixes
- Get a Custom RV Carport Built Right the First Time
- FAQ
- Sources
Sizing by RV Class: Recommended Dimensions and Examples
Matching a carport to your rig starts with knowing your RV class, since body height, width, and roofline vary enough to change the numbers significantly.
- Class A motorhomes: generally require around 14 feet of width, about 40 to 45 feet of length, and roughly 14 to 16 feet of clearance, since these rigs commonly stand approximately 12 to 13.5 feet tall before adding antennas or AC units.
- Class C motorhomes: usually fit within a 12 foot width, approximately 35 to 40 foot length, and about 12 to 13 feet of clearance, though the cab-over bunk area sometimes increases the overall height near Class A levels.
- Class B camper vans: require less space than larger classes, commonly around 10 to 12 feet wide, 22 to 26 feet long, and 10 to 11 feet of clearance.
- Travel trailers: fit well in a 12 to 14 foot wide bay with length sized to the trailer plus 5 to 10 feet for tongue and towing clearance.
- Fifth wheels: often need slightly more width (14 feet) to clear the raised front cap, with length following the same plus-5-to-10-foot rule.
- Pop-up campers: the smallest category, generally fitting well within a 10-foot wide and roughly 20 to 24 foot long bay.
A rough length formula works across classes: take your RV’s total length and add 5 to 10 feet. A 30-foot Class A needs roughly 35 to 40 feet of carport length; a 24 foot travel trailer needs 29 to 34 feet. Longer rigs in the 40 to 45 foot range, including large diesel pushers, often require custom lengths that stock carport kits simply do not offer.
Slide-outs and roof accessories change these baselines fast. A single slide-out can add 2 to 4 feet to the width you need if you want to extend it while parked, and satellite domes, AC shrouds, and roof vents routinely add 6 to 18 inches to the height figure before you even account for safety clearance.
How Tall Should an RV Carport Be and How Do You Measure Clearance?
Height is a common source of errors in carport orders because leg height — the vertical post dimension quoted by manufacturers — differs from usable clearance, which is reduced by factors like roof pitch, truss design, and any slope in the driveway or slab beneath.
- Measure your RV’s highest fixed point, including air conditioners, vents, and antennas, with the vehicle on a level surface.
- Add a safety buffer, typically 12 to 24 inches for taller rigs, to account for driveway crown, tire inflation changes, and minor measurement error.
- Check the roof pitch of the carport design, since a standard A-frame roof loses several inches of clearance toward the center compared to the eave height, while a vertical roof style retains more usable height across the full span.
- Confirm leg height versus total clearance with your installer, since a 14 foot leg height on a sloped roof may only deliver 12.5 feet of true clearance at the peak’s edges.
- Account for driveway slope, since even a gentle grade can eat into clearance if the carport’s low side sits at the base of a slope.
Owner discussions on forums like iRV2 often highlight the gap between a 12 foot leg height and an 18-foot leg height, especially for Class A owners who assumed a standard kit would clear their rig and found it fell short once roof accessories were factored in.
Pro Tip: Measure clearance with the RV parked on the actual site, not on a flat shop floor, since driveway slope changes the real number.
Width, Length, and Maneuvering: Practical Layout Considerations
A carport that technically fits your RV on paper can still be unusable if you can’t open a slide-out, swing a door, or turn into the bay without scraping a fender.
- Single-bay widths around 12 to 14 feet generally suit most Class B and C rigs and trailers without slide-outs.
- Double-bay widths roughly between 18 and 24 feet provide space for slide-out extensions, side storage, or additional vehicles and may be worth considering if budget permits.
- Length allowances should add 5 to 10 feet beyond your RV’s travel length to cover hitch overhang, tongue jacks, and tail-end clearance for backing in.
- Straight-in layouts work for most residential driveways, while angled bays reduce the turning radius needed on tight lots.
- Aprons extending 10 to 15 feet in front of the carport make backing and pulling forward significantly easier, especially for longer fifth wheels.
If you’re planning to upgrade RVs in the next few years, it’s worth sizing the carport for your next rig rather than your current one. Going from a 24 foot trailer to a 32-foot fifth wheel later means a carport built to minimum dimensions today becomes useless tomorrow, while a few extra feet of width and length up front rarely goes to waste.
Structural Considerations: Roof Style, Framing, and Load Ratings
The frame holding up your carport matters as much as the footprint, particularly once you’re dealing with tall rigs or a climate with real snow and wind loads.
- Vertical roof panels shed snow and rain more effectively than traditional A-frame styles and tend to preserve more usable clearance across the full width of the bay, which matters for Class A owners.
- 4-foot on-center framing (versus the standard 5-foot spacing) adds meaningful strength for taller structures that face higher wind exposure, since the additional vertical supports reduce flex across wider spans.
- Snow load and wind exposure vary by site elevation and region, and a structure rated for a mild climate can be undersized for a mountain property or an open, wind-exposed lot.
- Metal versus timber framing each carry trade-offs: metal typically allows longer clear spans and taller leg heights with less material bulk, while timber framing, as detailed in builder guides like Western Timber Frame’s RV cover resources, can support wider overhangs but often needs more substantial posts to achieve the same clearance.
Many Class A motorhomes stand 12 to 13.5 feet tall before accessories, which is why installers commonly push buyers toward 14 to 16 foot leg heights and vertical roof profiles rather than standard carport kits built for passenger vehicles.
Severe weather is part of this calculation too. Regions prone to large hail, as described in NOAA’s severe weather education resources, benefit from thicker roof panels and steeper pitches that shed impact energy rather than flexing under it.
Permits, Codes, and Standards to Check Before You Build
Most jurisdictions regulate carports the same way they regulate any permanent structure, and the size you want can bump directly into a local limit you didn’t know existed.
- Fixed foundations trigger permits in nearly every jurisdiction, while some areas exempt small, anchor-only structures below a certain square footage.
- Setback requirements from property lines, septic fields, or easements can shrink your buildable footprint more than the RV itself does.
- Maximum height limits in residential zones sometimes cap accessory structures below what a tall Class A rig actually needs, making a variance request necessary.
- State plan-review guidance, like the Washington L&I plan review guidelines for RVs, references ANSI/RVIA and NFPA standards and lists practical dimension limits, including a maximum legal width of 102 inches, that plan reviewers use when checking submissions.
- Federal vehicle size guidance, outlined in FHWA’s size regulations report, discusses overall length limits that can reach 65 feet for certain commercial combinations, useful context if you’re sizing a carport for a large toter-and-trailer setup.
Bring your exact vehicle measurements, site photos, and a proposed footprint sketch to any permit meeting. Reviewers move faster when they can see the real numbers instead of guessing from a brochure.
How to Measure Your RV Before Ordering or Building a Carport
Getting accurate measurements before you order prevents the most common and most expensive mistake: a carport that doesn’t actually fit.
- Measure overall length, including the hitch or tongue, and note both travel length and setup length separately if you own a towable with slide-outs.
- Measure total width with mirrors extended if you tend to park that way, and remember the legal road width cap is 102 inches per the Washington state plan review guidance, though your actual parked width may differ with accessories folded in.
- Measure the highest fixed rooftop item, whether that’s an AC unit, satellite dome, or antenna, since this single number drives your clearance requirement more than anything else.
- Record slide-out extents in the fully extended position if you plan to open them while parked under the carport.
- Take approach photos and measure driveway slope, since the turning radius and grade at your site affect both the footprint and the leg height you’ll need.
- Write down make, model, and year, which helps any installer cross-check manufacturer specifications against your own tape-measure numbers.
Builder guides, including Western Timber Frame’s RV cover resource, consistently emphasize measuring rooftop accessories and slide-outs in both positions, since skipping this step is the single most common reason a finished carport ends up too tight.
How Stoots Storage Solutions Approaches RV Carport Sizing
The process often starts with a site visit to verify measurements, accounting for driveway slope before finalizing a foundation plan.
For Class A owners and those with slide-outs, upsizing beyond stock dimensions is common, including wider bays, taller legs, and vertical roof panels where weather load is a concern. Site prep, concrete foundations, and turnkey installation may be handled by the provider, ensuring a single point of contact throughout. Jobs may be declined if quality standards are not met.
If your situation involves tight setbacks, a sloped site, or a rig outside standard dimensions, working with an installer beats guessing from a prefab kit chart.
Site Preparation and Ground Leveling for RV Carport Installation
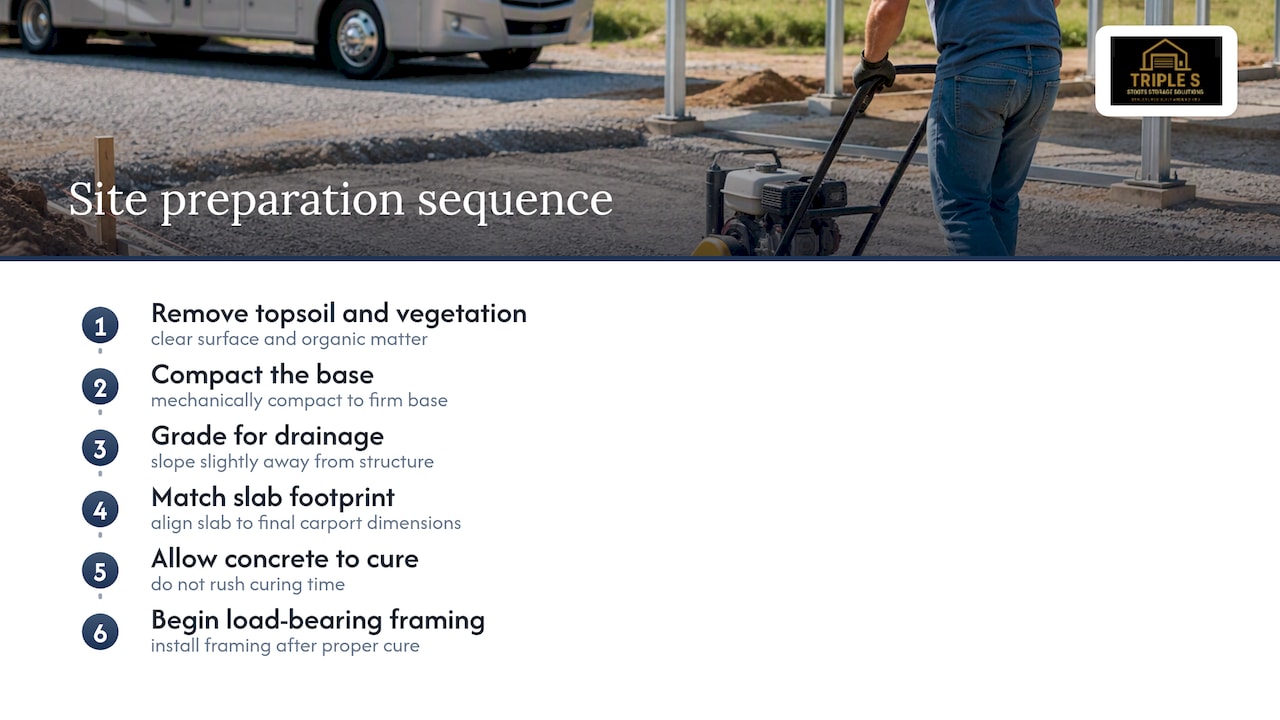
A carport is only as stable as the ground beneath it, and this step gets skipped more often than it should. Before any posts go in, the site needs to be cleared, graded, and checked for drainage, since water pooling against a foundation slab shortens its life and can undermine anchor points over time.
Ground leveling matters even more for RVs than for passenger vehicles, since a sloped slab changes your real clearance calculation and makes backing a long trailer into the bay harder than it needs to be. A proper site prep process typically includes removing topsoil and vegetation, compacting the base, and grading for a slight drainage slope away from the structure rather than toward it.
For fixed foundations, a concrete slab needs to cure properly before load-bearing framing goes up, and the slab’s footprint should match the final carport dimensions with enough margin for forms and edge work. Skipping grading or rushing a cure time are two of the most common reasons a carport develops settling issues within the first few years. Site prep and grading services exist specifically to handle this groundwork correctly the first time, which matters more on sloped or uneven lots than on a flat, already-graveled pad.
Common Materials Used for RV Carports and Their Durability
Metal remains the dominant material for RV carports, mainly because it supports longer clear spans and taller leg heights without the bulk that timber framing requires to achieve the same strength. Steel framing with metal roof panels resists rot, pest damage, and warping in ways that wood simply can’t match over a multi-decade lifespan.
Timber framing still has a place, particularly for owners who want a specific aesthetic or plan to integrate the carport into an existing wood structure. As Western Timber Frame’s RV cover guide notes, timber can support wide overhangs and open bays, though it generally needs heavier posts to match the clearance a metal frame delivers with less material.
Roof panel gauge and coating matter as much as the frame material. Thicker panels resist hail denting and wind flex better, which counts for something in regions where severe weather, as described in NOAA’s hail resources, is a regular concern. Galvanized or painted steel panels with a quality finish resist corrosion far longer than bare metal, and that finish quality is often the real difference between a carport that looks new after ten years and one that’s visibly rusting after three.
Ventilation and Protection Features Specific to RV Carports
An RV carport does more than block rain. Good airflow underneath reduces the moisture buildup that leads to mold on tires, awnings, and undercarriage components, especially in humid climates where a sealed, low-clearance structure traps damp air against the vehicle.
Open-sided carports naturally ventilate better than fully enclosed structures, which is part of why most RV owners choose a carport over a fully walled garage when storage space allows for either. The trade-off is less protection from blowing rain and snow at the open ends, so some owners add partial end walls or wind panels on the prevailing-weather side while keeping the opposite end open for airflow and easy drive-through access.
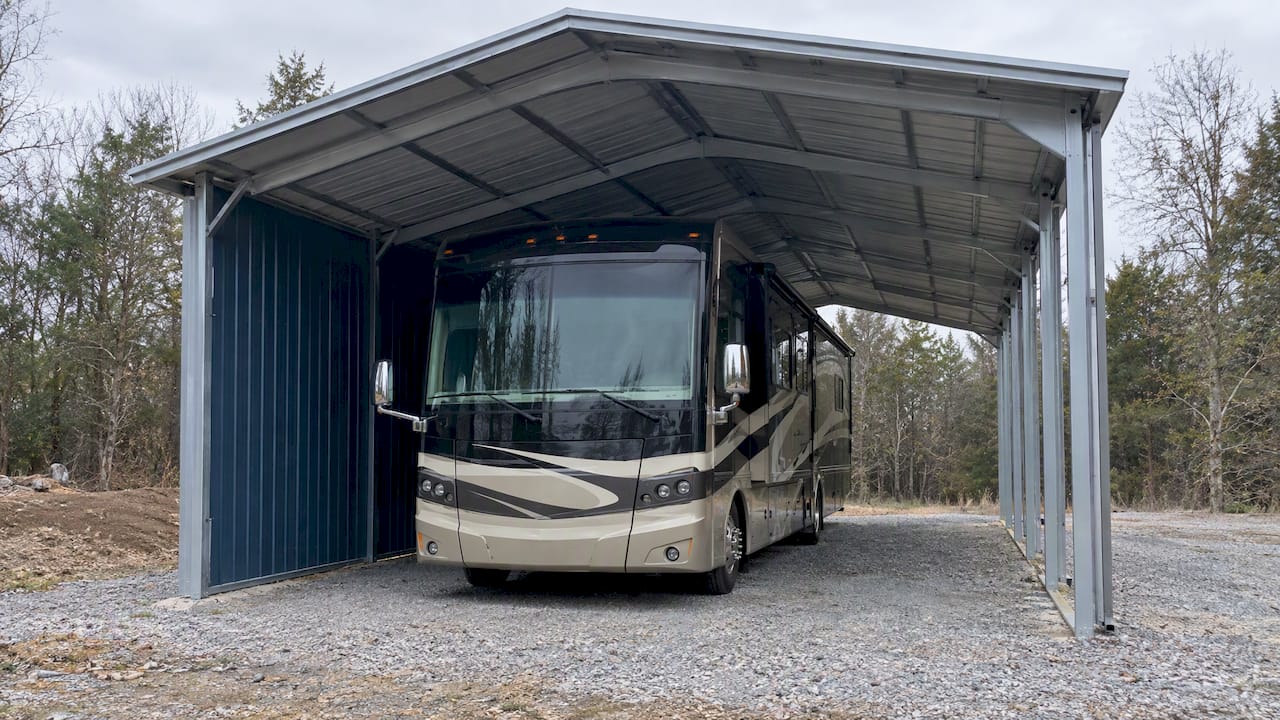
Roof overhangs extending a foot or two beyond the frame help keep wind-driven rain off the RV’s sides without sacrificing the ventilation benefits of an open structure. For owners in particularly wet or snowy regions, combining a vertical roof panel with a generous overhang tends to offer the best balance of weather protection and airflow, since the steeper pitch sheds precipitation fast while the open sides keep air moving underneath the vehicle.
Seasonal Considerations That Affect Carport Size and Design
Sun exposure, rain, and snow load each push carport sizing and design in slightly different directions, and the right answer depends heavily on where you live.
In sunny, hot climates, a wider roof overhang and taller clearance help keep direct sun off the RV’s roof and sides longer during the day, which reduces UV damage to seals, decals, and roof coatings. In regions with heavy rain, roof pitch and gutter placement matter more than raw size, since a flatter roof on an oversized structure can still funnel water poorly if the slope and drainage aren’t planned correctly.
Snow load is the factor most likely to force a larger or stronger structure than you’d otherwise choose. A vertical roof panel sheds snow faster than an A-frame, which matters because accumulated snow weight is one of the most common causes of carport frame failure in northern climates. Taller leg heights also help here, since more clearance between the roof and the RV reduces the risk of snow sliding directly onto the vehicle during a thaw.
Builders in snow-prone regions often recommend 4-foot on-center framing and reinforced trusses specifically to handle these seasonal loads, which is worth discussing with your installer before finalizing a footprint, especially if your site sits at a higher elevation than nearby weather station data would suggest.
Installer Perspective: Common Sizing Mistakes and Quick Fixes
The mistakes we see most often are predictable: underestimating height because the owner measured without the AC unit in mind, ignoring driveway slope until the slab goes in crooked, and forgetting a slide-out needs room to open. The fix is almost always the same: measure with the rig parked on-site, document everything with photos, and loop in a professional before you order rather than after. A quick site visit catches problems a spec sheet never will.
— Stoots
Get a Custom RV Carport Built Right the First Time
We build custom carports and RV covers sized to your actual rig, not a generic chart, and we handle the concrete foundations and turnkey installation ourselves from start to finish.

Before you request a quote, gather your RV’s length, width, and highest rooftop measurement, a few site photos, and whatever permit information your local office has given you. If interior storage is part of your plan, a partner resource like Classy Closets’ garage cabinet systems can help organize adjacent space once your carport is up. Reach out through our home page to start a quote built around your actual numbers.
FAQ
How much would it cost to build an RV carport?
Cost depends on size, foundation type, roof style, and local labor and material rates, with fixed foundations and taller leg heights generally raising the price over a basic anchor-kit structure. For an exact figure based on your site and RV dimensions, request a quote directly from a local installer rather than relying on a generic estimate.
What are the standard sizes of carports?
Standard prefabricated carports commonly come in single-bay widths around 12 feet and double-bay widths of 18 to 24 feet, with lengths often offered in increments like 21, 26, or 31 feet. RVs frequently need custom lengths and widths beyond these stock sizes, especially for Class A motorhomes and rigs with slide-outs.
Does a 20×20 carport need a permit?
Permit requirements depend entirely on your local jurisdiction, and a 20×20 footprint with a fixed foundation triggers a permit in most areas, even though some places exempt smaller anchor-only structures. Check with your local building department before you build, since setback and height rules vary by location.
How do I build my own RV carport?
Start by measuring your RV’s full length, width, and highest fixed point, then check local permit and setback rules before choosing a footprint. From there, decide between a stock kit sized to your measurements or a custom-built structure, and plan for proper site grading and a foundation rated for your region’s snow and wind loads.
Leave a Reply