For new poured footings, cast-in anchor rods set during the pour are the right call. For existing concrete, post-installed mechanical or chemical anchors handle most residential loads. For unpaved ground under a portable carport or light shed, screw or auger anchors do the job. Call an engineer when uplift is high, you are in a severe wind or seismic zone, or your slab shows cracking or thin, questionable depth.
TL;DR:
- New poured footings benefit from cast-in anchor rods during the pour, especially for new structures or large buildings with high uplift or seismic demands.
- Mechanical and chemical anchors are suitable for existing concrete, with chemical anchors preferred in cracked or poor-quality slabs to improve load capacity.
- Soil anchors like screw or auger anchors are ideal for unpaved ground supporting portable structures but are not engineered for permanent, load-bearing metal buildings.
- Proper installation, including hole cleaning, correct depth, and torque, is critical for anchor performance, and failure modes depend on embedment and edge distance.
- For high-wind or seismic zones, or if the slab shows cracking or questionable depth, hiring an engineer and obtaining certified documentation is essential.
Table of Contents
- Types of Anchors: Concrete, Mechanical, Chemical, Ground, and Specialty Options
- How Anchors Carry Load: Base Plates, Embedment, and Failure Modes
- Choosing the Right Anchor for Your Surface and Building
- Installing Anchors Correctly: Steps and Common Mistakes
- When to Call an Engineer or Request Special Inspection
- Material Choices and Long-Term Corrosion Protection
- Typical Costs and What to Buy
- Maintenance and Inspection Schedules for Installed Anchors
- Safety Practices During Anchor Installation and Inspection
- Standards and Certifications Worth Knowing
- Why Integrated Foundations and Engineered Anchors Matter
- How We Help With Foundations, Anchors, and Turnkey Installs
- FAQ
- Sources
Types of Anchors: Concrete, Mechanical, Chemical, Ground, and Specialty Options
Most homeowners shopping for metal building anchors run into five broad families, and knowing which one matches your project saves you a wasted trip to the hardware store.
Cast-in anchor rods and embedded plates go into wet concrete before it cures, which is why they are the preferred choice for new footings. Anchor rods and base plates transmit shear, axial and bending loads directly to the foundation, and setting them during the pour gives you the most predictable connection between a steel column and the slab, according to AISC’s guidance on anchor rods, base plates, and embedded plates.
Post-installed mechanical anchors (wedge, sleeve, and screw anchors) are drilled into concrete that has already cured. These are the anchors most homeowners buy for retrofitting a carport onto an existing driveway slab or securing a base plate to a patio pour.
Adhesive or chemical anchors use an epoxy or resin capsule instead of mechanical expansion. They get chosen over mechanical anchors when the concrete is cracked, when you need higher load capacity in a small footprint, or when you’re working close to an edge where a wedge anchor’s expansion force might spall the concrete.
Screw and auger earth anchors thread directly into soil instead of concrete. They are common for portable or lightweight structures and resist uplift reasonably well for their size, but they are not engineered to carry the loads of a permanent, column-supported metal building.
Specialty anchors round out the list for less common situations:
- Cast-in-place anchors for metal deck applications, which carry ICC-ES and FM approvals and specific installation tooling for deck-concrete systems, as shown on Hilti’s cast-in-place anchor product page.
- Anchor channels embedded for adjustable or repeated fastening points, often used where equipment or racking attaches later.
- Undercut anchors for high-capacity applications where standard expansion anchors fall short.
How Anchors Carry Load: Base Plates, Embedment, and Failure Modes
An anchor’s job sounds simple: keep the building attached to the ground. The engineering behind that job is where homeowner confusion usually starts.
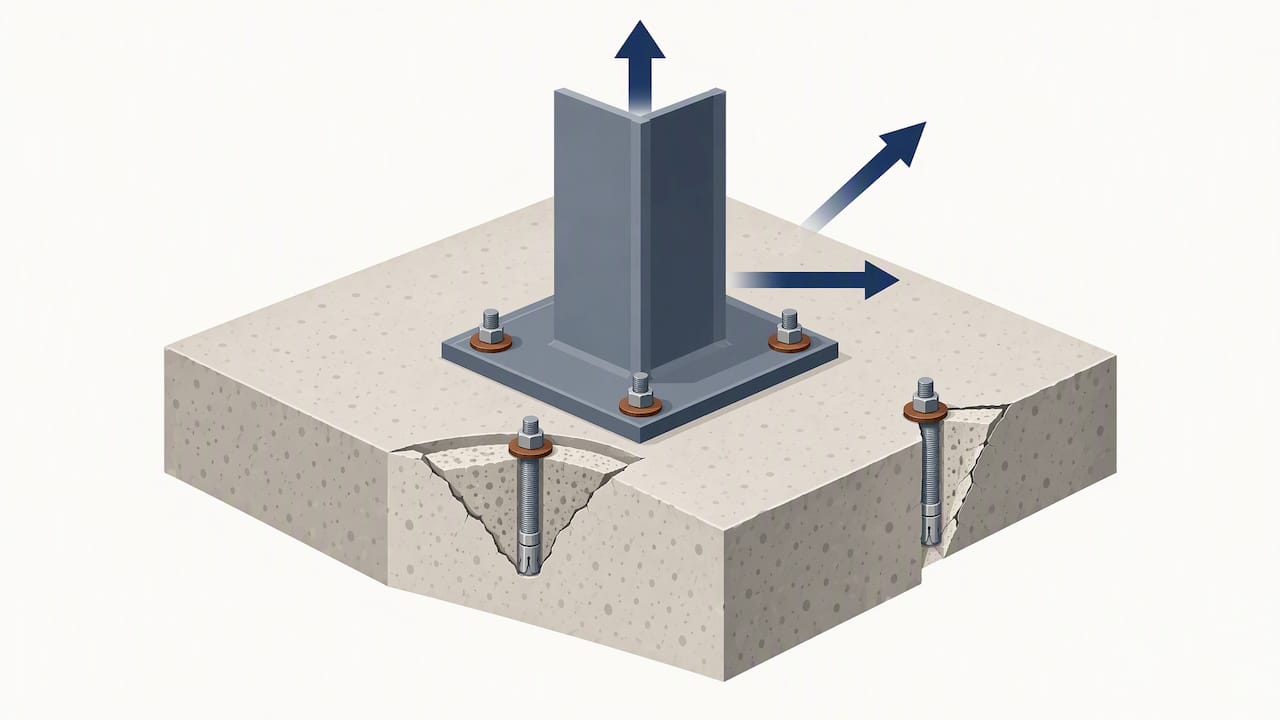
Every anchor connection has to resist three kinds of force: uplift (wind trying to lift the roof off), shear (lateral force pushing the base sideways), and combined loading when both act together, which is the normal case during a windstorm. The anchor rod and base plate work as a system, not as separate parts, transferring these forces from the steel column into the concrete, per AISC’s engineering FAQ on anchor rods and base plates.
Designers choose between exposed base plates (anchor rods visible above the slab, bolted down) and embedded connections (the plate cast into the concrete itself). Exposed connections are easier to level during installation and simpler to inspect or replace later. Embedded connections add stiffness and can improve seismic performance, but they require more careful concrete work during the pour and leave less room to correct a mistake.
Concrete itself can fail in ways that have nothing to do with the anchor’s strength. Cone breakout happens when the concrete around an anchor fractures in a cone shape before the steel ever yields, usually because embedment depth is too shallow for the load. Edge breakout happens when an anchor sits too close to the slab’s edge and the concrete shears out toward that edge instead of holding. Both failure modes explain why embedment depth and edge distance matter more than anchor diameter alone. A thicker anchor rod does not fix a slab that is too thin or an anchor placed too close to the edge, a point AISC’s engineering research on column base connections makes clear when discussing how embedded details and concrete pour quality interact.
Choosing the Right Anchor for Your Surface and Building
Matching anchor type to surface and building size follows a short logical sequence rather than guesswork.
- Start with the surface. New footing being poured now: use cast-in anchor rods. Existing concrete: move to mechanical or chemical anchors. Unpaved soil: use screw or auger ground anchors.
- If the concrete is existing, check its condition. Uncracked concrete in good shape generally accepts mechanical (wedge or sleeve) anchors. Cracked or uncertain-quality concrete usually calls for adhesive anchors, since epoxy can bond into imperfect substrate more reliably than an expansion anchor can grip it, a distinction documented in ACI and FEMA guidance on anchoring into hardened concrete.
- If the ground is soft or unpaved, pair auger anchors with manufacturer-rated tie-down straps rather than relying on the anchor alone to resist uplift.
- Check whether uplift or moment loads exceed what a standard anchor pattern handles. Large buildings, high-wind zones, and tall sidewalls generate bending moments at the base that push you into engineered anchor layouts rather than off-the-shelf spacing.
- Match material to environment. Galvanized anchors suit typical inland, dry conditions. Stainless steel earns its higher cost in coastal air, high-moisture soil, or anywhere deicing salt or fertilizer runoff contacts the hardware.
Applying this to common homeowner scenarios:
A portable carport on gravel or lawn typically uses auger or screw ground anchors with tie-down straps, following the strap sizing and capacity minimums set out for manufactured-home anchorage in 24 CFR 3285.402, even though that rule technically governs manufactured homes rather than carports; it’s still the best available benchmark for strap capacity.
A small garage on a new slab is the textbook case for cast-in anchor rods, sized and spaced according to the footing design.
A multi-bay metal building with tall columns and long spans almost always needs an engineered anchor layout, because the uplift and moment forces at each base plate scale with building size in ways a generic anchor bolt pattern cannot safely cover.
Installing Anchors Correctly: Steps and Common Mistakes
Installation quality determines anchor performance as much as the anchor itself does. ACI’s qualification documents stress that a post-installed anchor’s rated capacity assumes the hole was drilled, cleaned, and loaded exactly as the manufacturer specifies.
For post-installed mechanical or chemical anchors:
- Drill the hole to the diameter and depth stamped on the anchor’s instructions, not a close approximation.
- Clean the hole thoroughly with a brush and compressed air (or the manufacturer’s specified method) to remove drilling dust that weakens the bond.
- For chemical anchors, inject epoxy per the cartridge instructions and respect the manufacturer’s cure time before loading the anchor.
- Torque mechanical anchors to the specified value, not by feel.
For cast-in anchors, the critical steps happen during the pour: set the anchor rod template or bracket before concrete placement, confirm the plate or rod pattern is level and square, and hold position while the concrete cures so nothing shifts.
A basic tool checklist covers a hammer drill with the correct bit size, a wire brush and blower for hole cleaning, a torque wrench, and a bubble level for template placement during a pour.
The most common mistakes that quietly cut anchor capacity: skipping hole cleaning, drilling to the wrong depth, overtightening a mechanical anchor until it strips the threads, undertightening so the anchor never fully engages, and using a standard mechanical anchor in cracked concrete without confirming it is qualified for cracked-concrete service under ACI 318’s performance categories.
Pro Tip: Keep the anchor’s printed installation instructions on site during the job. Specs for hole depth, torque, and cure time vary by product, and “close enough” is how capacity gets lost.
When to Call an Engineer or Request Special Inspection
Most residential anchor jobs don’t need an engineer. A few specific triggers mean you should stop and bring one in.
Code and regulatory triggers worth knowing:
- Manufactured-home tie-down anchorage is governed by 24 CFR 3285.402, which requires certified engineering design in areas with severe wind exposure.
- ICC/IBC and ACI 318 set testing and qualification requirements for post-installed anchors, particularly where they support life-safety structures.
- ICC 500 governs anchoring for storm shelters, and FEMA’s foundation and anchoring criteria for safe rooms requires documented design information and often special inspection for anchors installed into hardened concrete.
Special inspection means a qualified third party verifies installation, typically through direct observation of hole drilling, cleaning, and adhesive placement, a step FEMA’s criteria call out specifically for storm shelters and safe rooms, and one ACI’s commentary extends to other critical post-installed anchor applications.
Questions worth asking any engineer or installer before you sign off on anchor work:
- What embedment depth and edge distance does this design assume, and does the existing slab meet it?
- What anchor performance category applies (cracked or uncracked concrete, seismic or non-seismic)?
- Can you provide the manufacturer’s ICC-ES evaluation report for the anchor specified?
- Does the anchor’s documentation show ACI 318 Chapter 17 testing compliance?
Material Choices and Long-Term Corrosion Protection
Environment drives anchor material choice more than most homeowners expect. Galvanized anchors handle typical dry, inland conditions well and cost less than stainless alternatives. Stainless steel earns its premium in coastal air, buried or consistently damp soil, or anywhere fertilizer, deicing salt, or chemical runoff reaches the hardware.
Coatings, grout, and embedment depth all affect how long an anchor lasts. A galvanized coating that gets scratched during installation loses protection right at that point, so handling anchors carefully during the drilling and setting process matters as much as picking the right metal. Fully embedding an anchor rod in grout, rather than leaving a gap at the base, reduces the path for moisture to reach bare steel.
Inspect exposed anchors periodically for rust streaking at the base plate, white efflorescence on surrounding concrete (a sign of moisture intrusion), or visible pitting on the anchor head. Any of these is worth photographing and tracking over time rather than ignoring.
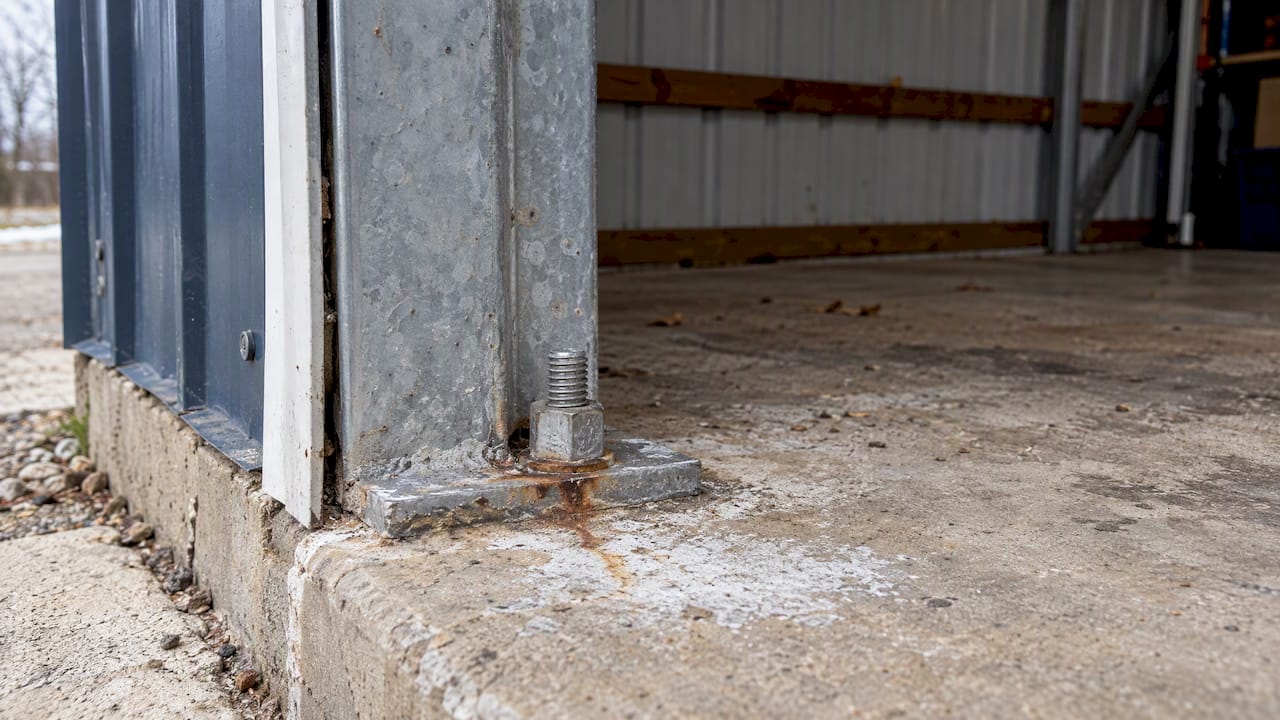
If an existing anchor shows early corrosion, retrofitting to a better category, such as swapping galvanized for stainless, or increasing embedment and edge distance during a planned upgrade, is a practical way to extend service life without replacing the whole foundation connection.
Typical Costs and What to Buy
Prices vary by region and supplier, but a few ranges hold generally true for DIY-scale purchases: auger or earth anchors typically run from a few dollars to around $30 each depending on length and rated capacity; mechanical wedge or sleeve anchors for residential use often fall between $1 and $10 per anchor depending on diameter; chemical anchor epoxy cartridges usually cost $15 to $40 per cartridge, enough for several anchor holes; and complete anchor rod and base plate assemblies for a small structure can range from $50 to a few hundred dollars depending on size and steel grade.
A complete purchase list for a DIY anchor job usually includes:
- The anchors themselves, in the quantity and size the plan specifies.
- Washers and nuts rated for the anchor diameter.
- Tie-down straps if you’re using ground anchors.
- A torque wrench or impact driver suited to the anchor’s fastener size.
- An epoxy gun if you’re installing chemical anchors.
Big-box hardware stores, specialty fastener suppliers, and tool rental counters for hammer drills cover most DIY needs. Before buying any anchor for a load-bearing application, check whether the product carries an ICC-ES evaluation report or FM approval, since those documents confirm third-party testing backs the manufacturer’s capacity claims. For anything beyond a small shed, a supplier offering installation support or certified installers is worth the extra cost over a bare product purchase.
Maintenance and Inspection Schedules for Installed Anchors
Anchors are not a set-it-and-forget-it part of your building. A simple annual walk-around, plus a check after any severe storm, catches most problems before they become structural ones.
Look at each visible base plate and anchor for rust, loose nuts, cracking in the surrounding concrete, or any gap opening up between the plate and the slab. A nut that backs off slightly is easy to retighten; a nut that’s loose because the anchor itself has started to pull out of degraded concrete is a different problem that needs a professional look.
For buildings in regions with freeze-thaw cycles, inspect after the first thaw each spring, since repeated freezing can accelerate small cracks around anchor points. Coastal or high-humidity properties warrant a closer look twice a year given faster corrosion rates in salt air.
Keep a simple log, even just a few photos with dates, so you can spot a crack or corrosion spot that is getting worse versus one that has been stable for years. If you ever added equipment, racking, or additional wind load to a building after it was anchored, it is worth confirming the original anchor layout still has capacity for the new load rather than assuming it does.
Safety Practices During Anchor Installation and Inspection
Drilling into concrete and working around base plates carries real risks that are easy to underestimate on a weekend project.
Wear safety glasses and a dust mask when drilling, since concrete dust contains silica that is harmful to breathe over repeated exposure. Hammer drills kick back unexpectedly when they hit rebar or aggregate, so keep a firm two-handed grip and brace your stance.
When working with chemical anchor epoxy, follow the manufacturer’s ventilation and skin-contact guidance on the cartridge, since some formulations cause irritation. If you’re drilling into an existing slab, use a rebar scanner or at minimum proceed cautiously, since cutting through embedded rebar both weakens the anchor hole and risks damaging the tool.
During inspection, whether it’s your own annual check or a contractor’s special inspection for critical structures, never apply load-testing force to an anchor you suspect is already compromised. A visibly loose or corroded anchor should be flagged and addressed before the structure sees another wind event, not tested to find its remaining capacity.
Standards and Certifications Worth Knowing
A handful of standards bodies show up repeatedly in anchor documentation, and recognizing them helps you evaluate a product or installer’s claims.
ACI (American Concrete Institute) sets the testing and qualification requirements for post-installed anchors through ACI 318 Chapter 17, including performance categories for cracked versus uncracked concrete and seismic applications, detailed in ACI’s post-installed anchor qualification commentary.
AISC (American Institute of Steel Construction) publishes design guidance for anchor rods, base plates, and embedded connections used in steel-framed metal buildings.
ASTM standards govern the material specifications for anchor steel, bolts, and coatings, confirming that a given anchor meets specific strength and corrosion-resistance grades.
ICC-ES evaluation reports and FM (Factory Mutual) approvals are third-party verifications that a specific manufacturer’s anchor product has been tested and meets code-referenced performance claims, which is why checking for these reports before purchase matters more than brand reputation alone.
Why Integrated Foundations and Engineered Anchors Matter
We’ve watched enough projects go sideways from undersized footings or mismatched anchor layouts to know the foundation and the anchoring plan have to be designed together, not bolted on afterward. We prioritize proper site prep and footing sizing before anchor selection ever comes up, and for larger buildings we work from engineered anchor layouts rather than generic bolt patterns.
We strongly recommend building anchoring into your initial quote instead of retrofitting it later. Whoever installs your building, compare their anchor layout against the manufacturer’s or an engineer’s specification before concrete goes in the ground.
— Stoots
How We Help With Foundations, Anchors, and Turnkey Installs
Getting the foundation and anchoring right the first time saves you from a retrofit later, and that’s exactly where our Concrete & Foundations and Turnkey Installs services fit. We offer coordinated services for site prep, grading, footing pouring, and anchor setting to streamline the process rather than passing you between separate contractors.
If you’re planning a garage, carport, barn, or custom metal building, bring us your rough size, site photos, and any plans you already have, and we’ll work out an anchor layout that matches your building’s actual load requirements. Reach out through our concrete and foundation services page to request a quote or schedule a site evaluation.
FAQ
Do they make metal anchors specifically for metal buildings?
Yes, anchor rods, base plates, and embedded plate assemblies are manufactured specifically for steel-framed metal buildings, designed to transfer shear, axial, and bending loads from the column into the foundation, according to AISC’s guidance on anchor rods and base plates. Cast-in-place anchors for metal deck applications are also manufactured with specific ICC-ES and FM approvals for that use.
How do I anchor a portable carport to the ground?
Portable carports on unpaved ground typically use screw or auger ground anchors paired with manufacturer-rated tie-down straps. The strap sizing and minimum capacity standards used for manufactured-home tie-downs under 24 CFR 3285.402 offer a useful capacity benchmark, even though carports fall outside that specific rule.
Can I install anchor bolts into existing concrete?
Yes, post-installed mechanical or chemical anchors are designed for exactly this. Uncracked concrete in good condition generally accepts mechanical wedge or sleeve anchors, while cracked or uncertain-quality concrete usually calls for chemical anchors qualified for cracked-concrete service under ACI 318.
Should I anchor my shed to the ground?
Yes, nearly every shed benefits from ground anchoring to resist wind uplift, and lightweight or portable sheds typically use screw or auger earth anchors for this purpose. Larger sheds on a poured slab should use cast-in anchor rods or post-installed anchors sized to the structure’s actual uplift exposure rather than a generic anchor kit.
What embedment depth do typical foundation anchors need?
Embedment depth depends on the anchor type and load, but JLC’s field guide for anchors notes that typical foundation anchor bolts need a minimum embedment around 7 inches, with spacing at a maximum of about 6 feet on center for exterior sill plates. Larger structures or higher uplift demands require engineered embedment depths specific to the building’s design.
Leave a Reply