Steel prices keep climbing. A 15% deposit locks your quoted price until spring. Get a quote →

Author: stootsstoragesolutions93

  • Homeowners: 5 Metal Building Anchor Types and When to Call an Engineer

    Homeowners: 5 Metal Building Anchor Types and When to Call an Engineer

    For new poured footings, cast-in anchor rods set during the pour are the right call. For existing concrete, post-installed mechanical or chemical anchors handle most residential loads. For unpaved ground under a portable carport or light shed, screw or auger anchors do the job. Call an engineer when uplift is high, you are in a severe wind or seismic zone, or your slab shows cracking or thin, questionable depth.


    TL;DR:

    • New poured footings benefit from cast-in anchor rods during the pour, especially for new structures or large buildings with high uplift or seismic demands.
    • Mechanical and chemical anchors are suitable for existing concrete, with chemical anchors preferred in cracked or poor-quality slabs to improve load capacity.
    • Soil anchors like screw or auger anchors are ideal for unpaved ground supporting portable structures but are not engineered for permanent, load-bearing metal buildings.
    • Proper installation, including hole cleaning, correct depth, and torque, is critical for anchor performance, and failure modes depend on embedment and edge distance.
    • For high-wind or seismic zones, or if the slab shows cracking or questionable depth, hiring an engineer and obtaining certified documentation is essential.

    Stoots Storage Solutions
    stootsstorage.com
    Plan A Building That Fits
    Stoots Storage Solutions designs, manufactures, and installs custom metal buildings for residential and agricultural needs in the Galax region.

    Visit Stoots Storage Solutions

    Table of Contents

    Types of Anchors: Concrete, Mechanical, Chemical, Ground, and Specialty Options

    Most homeowners shopping for metal building anchors run into five broad families, and knowing which one matches your project saves you a wasted trip to the hardware store.

    Cast-in anchor rods and embedded plates go into wet concrete before it cures, which is why they are the preferred choice for new footings. Anchor rods and base plates transmit shear, axial and bending loads directly to the foundation, and setting them during the pour gives you the most predictable connection between a steel column and the slab, according to AISC’s guidance on anchor rods, base plates, and embedded plates.

    Post-installed mechanical anchors (wedge, sleeve, and screw anchors) are drilled into concrete that has already cured. These are the anchors most homeowners buy for retrofitting a carport onto an existing driveway slab or securing a base plate to a patio pour.

    Adhesive or chemical anchors use an epoxy or resin capsule instead of mechanical expansion. They get chosen over mechanical anchors when the concrete is cracked, when you need higher load capacity in a small footprint, or when you’re working close to an edge where a wedge anchor’s expansion force might spall the concrete.

    Screw and auger earth anchors thread directly into soil instead of concrete. They are common for portable or lightweight structures and resist uplift reasonably well for their size, but they are not engineered to carry the loads of a permanent, column-supported metal building.

    Specialty anchors round out the list for less common situations:

    • Cast-in-place anchors for metal deck applications, which carry ICC-ES and FM approvals and specific installation tooling for deck-concrete systems, as shown on Hilti’s cast-in-place anchor product page.
    • Anchor channels embedded for adjustable or repeated fastening points, often used where equipment or racking attaches later.
    • Undercut anchors for high-capacity applications where standard expansion anchors fall short.

    How Anchors Carry Load: Base Plates, Embedment, and Failure Modes

    An anchor’s job sounds simple: keep the building attached to the ground. The engineering behind that job is where homeowner confusion usually starts.

    Every anchor connection has to resist three kinds of force: uplift (wind trying to lift the roof off), shear (lateral force pushing the base sideways), and combined loading when both act together, which is the normal case during a windstorm. The anchor rod and base plate work as a system, not as separate parts, transferring these forces from the steel column into the concrete, per AISC’s engineering FAQ on anchor rods and base plates.

    Designers choose between exposed base plates (anchor rods visible above the slab, bolted down) and embedded connections (the plate cast into the concrete itself). Exposed connections are easier to level during installation and simpler to inspect or replace later. Embedded connections add stiffness and can improve seismic performance, but they require more careful concrete work during the pour and leave less room to correct a mistake.

    Concrete itself can fail in ways that have nothing to do with the anchor’s strength. Cone breakout happens when the concrete around an anchor fractures in a cone shape before the steel ever yields, usually because embedment depth is too shallow for the load. Edge breakout happens when an anchor sits too close to the slab’s edge and the concrete shears out toward that edge instead of holding. Both failure modes explain why embedment depth and edge distance matter more than anchor diameter alone. A thicker anchor rod does not fix a slab that is too thin or an anchor placed too close to the edge, a point AISC’s engineering research on column base connections makes clear when discussing how embedded details and concrete pour quality interact.
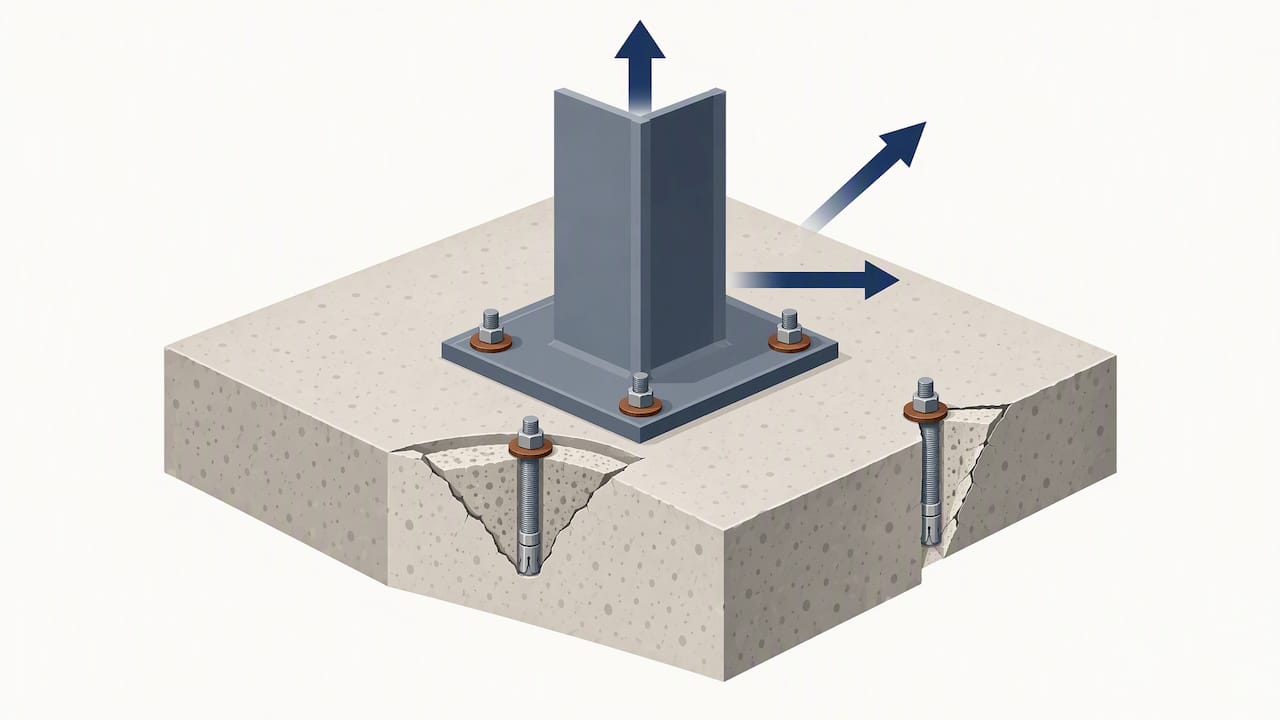
    Anchor forces and concrete breakout illustration

    Choosing the Right Anchor for Your Surface and Building

    Matching anchor type to surface and building size follows a short logical sequence rather than guesswork.

    1. Start with the surface. New footing being poured now: use cast-in anchor rods. Existing concrete: move to mechanical or chemical anchors. Unpaved soil: use screw or auger ground anchors.
    2. If the concrete is existing, check its condition. Uncracked concrete in good shape generally accepts mechanical (wedge or sleeve) anchors. Cracked or uncertain-quality concrete usually calls for adhesive anchors, since epoxy can bond into imperfect substrate more reliably than an expansion anchor can grip it, a distinction documented in ACI and FEMA guidance on anchoring into hardened concrete.
    3. If the ground is soft or unpaved, pair auger anchors with manufacturer-rated tie-down straps rather than relying on the anchor alone to resist uplift.
    4. Check whether uplift or moment loads exceed what a standard anchor pattern handles. Large buildings, high-wind zones, and tall sidewalls generate bending moments at the base that push you into engineered anchor layouts rather than off-the-shelf spacing.
    5. Match material to environment. Galvanized anchors suit typical inland, dry conditions. Stainless steel earns its higher cost in coastal air, high-moisture soil, or anywhere deicing salt or fertilizer runoff contacts the hardware.

    Applying this to common homeowner scenarios:

    A portable carport on gravel or lawn typically uses auger or screw ground anchors with tie-down straps, following the strap sizing and capacity minimums set out for manufactured-home anchorage in 24 CFR 3285.402, even though that rule technically governs manufactured homes rather than carports; it’s still the best available benchmark for strap capacity.

    A small garage on a new slab is the textbook case for cast-in anchor rods, sized and spaced according to the footing design.

    A multi-bay metal building with tall columns and long spans almost always needs an engineered anchor layout, because the uplift and moment forces at each base plate scale with building size in ways a generic anchor bolt pattern cannot safely cover.

    Installing Anchors Correctly: Steps and Common Mistakes

    Installation quality determines anchor performance as much as the anchor itself does. ACI’s qualification documents stress that a post-installed anchor’s rated capacity assumes the hole was drilled, cleaned, and loaded exactly as the manufacturer specifies.

    For post-installed mechanical or chemical anchors:

    • Drill the hole to the diameter and depth stamped on the anchor’s instructions, not a close approximation.
    • Clean the hole thoroughly with a brush and compressed air (or the manufacturer’s specified method) to remove drilling dust that weakens the bond.
    • For chemical anchors, inject epoxy per the cartridge instructions and respect the manufacturer’s cure time before loading the anchor.
    • Torque mechanical anchors to the specified value, not by feel.

    For cast-in anchors, the critical steps happen during the pour: set the anchor rod template or bracket before concrete placement, confirm the plate or rod pattern is level and square, and hold position while the concrete cures so nothing shifts.

    A basic tool checklist covers a hammer drill with the correct bit size, a wire brush and blower for hole cleaning, a torque wrench, and a bubble level for template placement during a pour.

    The most common mistakes that quietly cut anchor capacity: skipping hole cleaning, drilling to the wrong depth, overtightening a mechanical anchor until it strips the threads, undertightening so the anchor never fully engages, and using a standard mechanical anchor in cracked concrete without confirming it is qualified for cracked-concrete service under ACI 318’s performance categories.

    Pro Tip: Keep the anchor’s printed installation instructions on site during the job. Specs for hole depth, torque, and cure time vary by product, and “close enough” is how capacity gets lost.

    When to Call an Engineer or Request Special Inspection

    Most residential anchor jobs don’t need an engineer. A few specific triggers mean you should stop and bring one in.

    Code and regulatory triggers worth knowing:

    • Manufactured-home tie-down anchorage is governed by 24 CFR 3285.402, which requires certified engineering design in areas with severe wind exposure.
    • ICC/IBC and ACI 318 set testing and qualification requirements for post-installed anchors, particularly where they support life-safety structures.
    • ICC 500 governs anchoring for storm shelters, and FEMA’s foundation and anchoring criteria for safe rooms requires documented design information and often special inspection for anchors installed into hardened concrete.

    Special inspection means a qualified third party verifies installation, typically through direct observation of hole drilling, cleaning, and adhesive placement, a step FEMA’s criteria call out specifically for storm shelters and safe rooms, and one ACI’s commentary extends to other critical post-installed anchor applications.

    Questions worth asking any engineer or installer before you sign off on anchor work:

    • What embedment depth and edge distance does this design assume, and does the existing slab meet it?
    • What anchor performance category applies (cracked or uncracked concrete, seismic or non-seismic)?
    • Can you provide the manufacturer’s ICC-ES evaluation report for the anchor specified?
    • Does the anchor’s documentation show ACI 318 Chapter 17 testing compliance?

    Material Choices and Long-Term Corrosion Protection

    Environment drives anchor material choice more than most homeowners expect. Galvanized anchors handle typical dry, inland conditions well and cost less than stainless alternatives. Stainless steel earns its premium in coastal air, buried or consistently damp soil, or anywhere fertilizer, deicing salt, or chemical runoff reaches the hardware.

    Coatings, grout, and embedment depth all affect how long an anchor lasts. A galvanized coating that gets scratched during installation loses protection right at that point, so handling anchors carefully during the drilling and setting process matters as much as picking the right metal. Fully embedding an anchor rod in grout, rather than leaving a gap at the base, reduces the path for moisture to reach bare steel.

    Inspect exposed anchors periodically for rust streaking at the base plate, white efflorescence on surrounding concrete (a sign of moisture intrusion), or visible pitting on the anchor head. Any of these is worth photographing and tracking over time rather than ignoring.
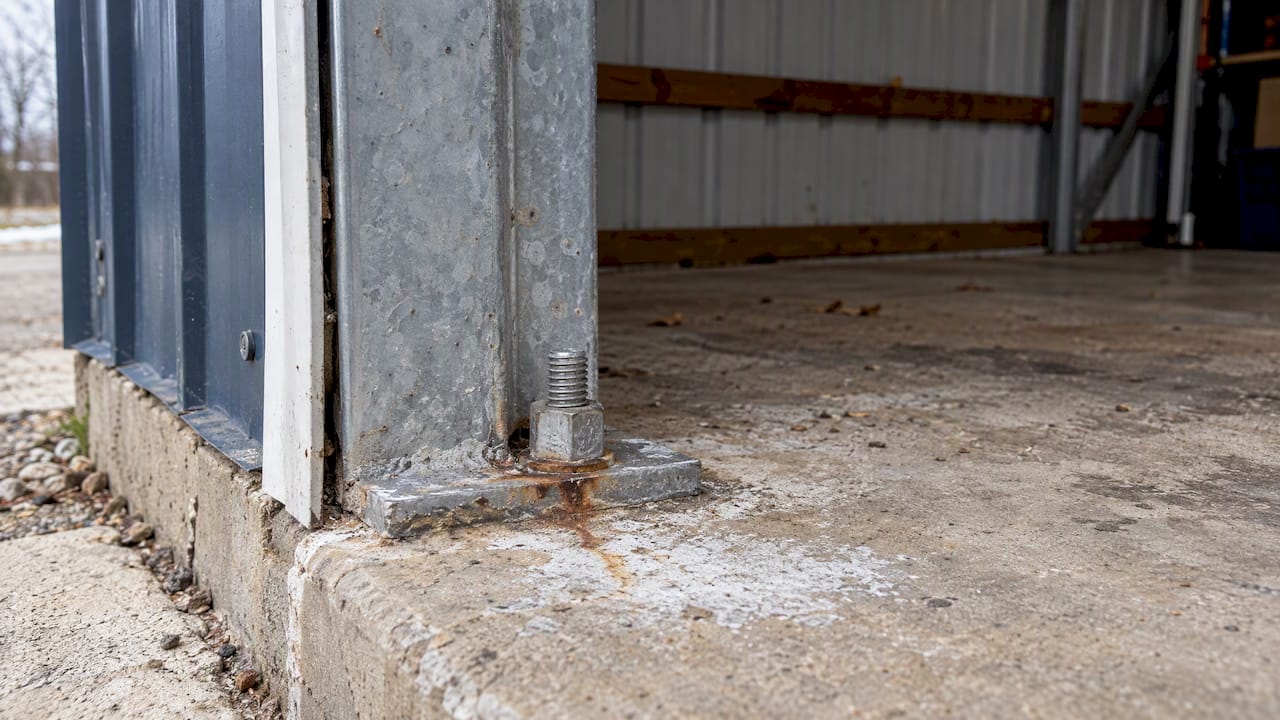
    Rust and efflorescence around anchor plate

    If an existing anchor shows early corrosion, retrofitting to a better category, such as swapping galvanized for stainless, or increasing embedment and edge distance during a planned upgrade, is a practical way to extend service life without replacing the whole foundation connection.

    Typical Costs and What to Buy

    Prices vary by region and supplier, but a few ranges hold generally true for DIY-scale purchases: auger or earth anchors typically run from a few dollars to around $30 each depending on length and rated capacity; mechanical wedge or sleeve anchors for residential use often fall between $1 and $10 per anchor depending on diameter; chemical anchor epoxy cartridges usually cost $15 to $40 per cartridge, enough for several anchor holes; and complete anchor rod and base plate assemblies for a small structure can range from $50 to a few hundred dollars depending on size and steel grade.

    A complete purchase list for a DIY anchor job usually includes:

    • The anchors themselves, in the quantity and size the plan specifies.
    • Washers and nuts rated for the anchor diameter.
    • Tie-down straps if you’re using ground anchors.
    • A torque wrench or impact driver suited to the anchor’s fastener size.
    • An epoxy gun if you’re installing chemical anchors.

    Big-box hardware stores, specialty fastener suppliers, and tool rental counters for hammer drills cover most DIY needs. Before buying any anchor for a load-bearing application, check whether the product carries an ICC-ES evaluation report or FM approval, since those documents confirm third-party testing backs the manufacturer’s capacity claims. For anything beyond a small shed, a supplier offering installation support or certified installers is worth the extra cost over a bare product purchase.

    Maintenance and Inspection Schedules for Installed Anchors

    Anchors are not a set-it-and-forget-it part of your building. A simple annual walk-around, plus a check after any severe storm, catches most problems before they become structural ones.

    Look at each visible base plate and anchor for rust, loose nuts, cracking in the surrounding concrete, or any gap opening up between the plate and the slab. A nut that backs off slightly is easy to retighten; a nut that’s loose because the anchor itself has started to pull out of degraded concrete is a different problem that needs a professional look.

    For buildings in regions with freeze-thaw cycles, inspect after the first thaw each spring, since repeated freezing can accelerate small cracks around anchor points. Coastal or high-humidity properties warrant a closer look twice a year given faster corrosion rates in salt air.

    Keep a simple log, even just a few photos with dates, so you can spot a crack or corrosion spot that is getting worse versus one that has been stable for years. If you ever added equipment, racking, or additional wind load to a building after it was anchored, it is worth confirming the original anchor layout still has capacity for the new load rather than assuming it does.

    Safety Practices During Anchor Installation and Inspection

    Drilling into concrete and working around base plates carries real risks that are easy to underestimate on a weekend project.

    Wear safety glasses and a dust mask when drilling, since concrete dust contains silica that is harmful to breathe over repeated exposure. Hammer drills kick back unexpectedly when they hit rebar or aggregate, so keep a firm two-handed grip and brace your stance.

    When working with chemical anchor epoxy, follow the manufacturer’s ventilation and skin-contact guidance on the cartridge, since some formulations cause irritation. If you’re drilling into an existing slab, use a rebar scanner or at minimum proceed cautiously, since cutting through embedded rebar both weakens the anchor hole and risks damaging the tool.

    During inspection, whether it’s your own annual check or a contractor’s special inspection for critical structures, never apply load-testing force to an anchor you suspect is already compromised. A visibly loose or corroded anchor should be flagged and addressed before the structure sees another wind event, not tested to find its remaining capacity.

    Standards and Certifications Worth Knowing

    A handful of standards bodies show up repeatedly in anchor documentation, and recognizing them helps you evaluate a product or installer’s claims.

    ACI (American Concrete Institute) sets the testing and qualification requirements for post-installed anchors through ACI 318 Chapter 17, including performance categories for cracked versus uncracked concrete and seismic applications, detailed in ACI’s post-installed anchor qualification commentary.

    AISC (American Institute of Steel Construction) publishes design guidance for anchor rods, base plates, and embedded connections used in steel-framed metal buildings.

    ASTM standards govern the material specifications for anchor steel, bolts, and coatings, confirming that a given anchor meets specific strength and corrosion-resistance grades.

    ICC-ES evaluation reports and FM (Factory Mutual) approvals are third-party verifications that a specific manufacturer’s anchor product has been tested and meets code-referenced performance claims, which is why checking for these reports before purchase matters more than brand reputation alone.

    Why Integrated Foundations and Engineered Anchors Matter

    We’ve watched enough projects go sideways from undersized footings or mismatched anchor layouts to know the foundation and the anchoring plan have to be designed together, not bolted on afterward. We prioritize proper site prep and footing sizing before anchor selection ever comes up, and for larger buildings we work from engineered anchor layouts rather than generic bolt patterns.

    We strongly recommend building anchoring into your initial quote instead of retrofitting it later. Whoever installs your building, compare their anchor layout against the manufacturer’s or an engineer’s specification before concrete goes in the ground.

    — Stoots

    How We Help With Foundations, Anchors, and Turnkey Installs

    Getting the foundation and anchoring right the first time saves you from a retrofit later, and that’s exactly where our Concrete & Foundations and Turnkey Installs services fit. We offer coordinated services for site prep, grading, footing pouring, and anchor setting to streamline the process rather than passing you between separate contractors.
    Stoots Storage Solutions

    If you’re planning a garage, carport, barn, or custom metal building, bring us your rough size, site photos, and any plans you already have, and we’ll work out an anchor layout that matches your building’s actual load requirements. Reach out through our concrete and foundation services page to request a quote or schedule a site evaluation.

    FAQ

    Do they make metal anchors specifically for metal buildings?

    Yes, anchor rods, base plates, and embedded plate assemblies are manufactured specifically for steel-framed metal buildings, designed to transfer shear, axial, and bending loads from the column into the foundation, according to AISC’s guidance on anchor rods and base plates. Cast-in-place anchors for metal deck applications are also manufactured with specific ICC-ES and FM approvals for that use.

    How do I anchor a portable carport to the ground?

    Portable carports on unpaved ground typically use screw or auger ground anchors paired with manufacturer-rated tie-down straps. The strap sizing and minimum capacity standards used for manufactured-home tie-downs under 24 CFR 3285.402 offer a useful capacity benchmark, even though carports fall outside that specific rule.

    Can I install anchor bolts into existing concrete?

    Yes, post-installed mechanical or chemical anchors are designed for exactly this. Uncracked concrete in good condition generally accepts mechanical wedge or sleeve anchors, while cracked or uncertain-quality concrete usually calls for chemical anchors qualified for cracked-concrete service under ACI 318.

    Should I anchor my shed to the ground?

    Yes, nearly every shed benefits from ground anchoring to resist wind uplift, and lightweight or portable sheds typically use screw or auger earth anchors for this purpose. Larger sheds on a poured slab should use cast-in anchor rods or post-installed anchors sized to the structure’s actual uplift exposure rather than a generic anchor kit.

    What embedment depth do typical foundation anchors need?

    Embedment depth depends on the anchor type and load, but JLC’s field guide for anchors notes that typical foundation anchor bolts need a minimum embedment around 7 inches, with spacing at a maximum of about 6 feet on center for exterior sill plates. Larger structures or higher uplift demands require engineered embedment depths specific to the building’s design.
    Sources

  • How to Vet a Metal Building Company Before You Buy

    How to Vet a Metal Building Company Before You Buy

    Buying a metal building means trusting a company with a good chunk of money, often before anything shows up on your property. Most companies in this industry are honest. Some aren’t. And some just aren’t good at what they do.

    John has been in the metal building industry since its early days and is known as a trusted voice in metal-building Facebook groups. Over the years we’ve cut ties with 53 manufacturers over quality and integrity concerns and kept 4 we trust. That process taught us a lot about what to look for. Here’s the same advice John gives buyers about any metal building company, including us.

    John’s 4-step check

    Step 1: Check their Facebook business page

    Look up the company’s Facebook business page and find the reviews. If reviews aren’t showing, move on.

    A company with real, happy customers usually has reviews you can see. Hidden or turned-off reviews can be a sign they’re trying to keep something out of view.

    Step 2: Make sure they’ve been in business more than a couple of years

    New companies aren’t automatically bad, but a company that has only been around a short time hasn’t had the chance to prove it can handle problems, stand behind its work, and stay in business. You want to know they’ll still be around if something comes up after your building is installed.

    Check how long the business page has been active, when the company was registered with the state, and how far back the reviews go.

    Step 3: Watch for fake reviews

    Fake reviews are out there. A few patterns give them away:

    • Reviewer names that seem odd or foreign for a local business
    • Many reviews posted very close together, like a bunch in the same few days
    • Short, generic reviews that don’t mention any details about the job
    • Reviewer profiles with little or no other activity

    Real reviews tend to trickle in over time and talk about specific things: the crew, the site prep, the concrete, how a problem got handled.

    Step 4: Repeat the review check on Google

    Do the same thing on Google. Look at the company’s Google reviews and run the same checks: Are reviews showing? Do they go back a while? Do any look fake? A company that looks good on one platform and shaky on the other deserves a closer look.

    Other red flags

    Beyond the 4 steps, watch out for:

    • Pressure to pay in full up front before any work is done
    • Prices far lower than everyone else without a clear reason. Ask what’s different about the steel, certification, or what’s included
    • No answers on certification or engineered drawings for your wind and snow loads
    • Vague quotes that don’t spell out size, height, roof style, doors, and what’s included
    • No clear point of contact, or a different person every time you call
    • Unclear foundation plans, or a shrug when you ask about frost depth

    Good signs to look for

    • Reviews that show up on both Facebook and Google and go back a while
    • Clear, written quotes
    • Certified buildings with engineered drawings available
    • Payments that follow the work instead of everything up front
    • Someone who answers your questions plainly, including the ones they’d rather not

    How we line up with this

    We’d rather you check us out than take our word for it. Run us through the same 4 steps. A few things about how we work:

    • We’re a family-run business based in Southwest Virginia
    • We work with 4 carefully vetted manufacturers after cutting ties with 53 others
    • Our buildings are certified for local wind and snow loads, with engineered drawings available
    • On turnkey jobs, one company handles site review, site prep, footers, slab, and the install, with one point of contact
    • Concrete payments follow the work: 10% of the job subtotal at signing (non-refundable), 35% of the remaining balance at footer pour completion, and 65% at the 4-inch slab pour

    Learn more about us, see finished jobs in our gallery, or check whether we serve your state on our service area page.

    Questions to ask any company

    QuestionWhy it matters
    How long have you been in business?Shows whether they can stand behind their work
    Is the building certified for my county?Affects safety and permits
    Can I get engineered drawings?Often needed for permits
    What exactly is included in this quote?Avoids surprises later
    Who handles site prep and concrete?Fewer handoffs, fewer problems
    When do I pay, and how much?Payments should follow the work

    Take your time

    A good company won’t rush you. Check reviews, ask questions, and compare quotes for the same building. If something feels off, trust that.

    When you’re ready, call or text John at 276-235-1191, or send us a message through the contact form. Ask us anything. We’ll quote it.

    Common Questions

    What is the first thing I should check about a metal building company?

    Look at their Facebook business page. If reviews aren’t showing, move on.

    How can I spot fake reviews?

    Watch for odd or foreign reviewer names, many reviews posted very close together, generic wording, and reviewer profiles with little other activity.

    How long should a company have been in business?

    More than a couple of years. That gives them time to show they can stand behind their work and stay in business.

    Should I check Google reviews too?

    Yes. Repeat the same review checks on Google. A company that looks good on one platform and shaky on the other deserves a closer look.

    Is a much lower price a red flag?

    It can be. Ask what is different about the steel, certification, and what is included before assuming it is a better deal.

    Ready to price your building?

    Call or text 276-235-1191, or send us the size, location and what it is for. We will come back with a real number.

    Build & Get a Quote Text Us

  • Metal Building vs Wood Garage: What Lasts Longer?

    Metal Building vs Wood Garage: What Lasts Longer?

    A stick-built wood garage is what a lot of folks grew up with. Steel garages have become a common choice over the years. If you’re deciding between the two, the question usually comes down to this: which one will hold up better with less work?

    Here’s how they compare.

    How they’re built

    A wood garage is framed on site with lumber: studs, rafters or trusses, sheathing, and then siding and roofing. It’s built piece by piece by a framing crew.

    A steel garage uses a manufactured steel frame with steel roof and wall panels. The parts are made by the manufacturer, delivered, and assembled on site. Our buildings are delivered, set, anchored, and checked before the crew leaves.

    What wears out a wood garage

    Rot

    Wood and water don’t get along. Leaky roofs, splashing rain at the base of walls, and ground moisture all lead to rot over time. Sill plates, the bottom of the siding, and roof decking are common trouble spots.

    Termites and other pests

    Termites, carpenter ants, and carpenter bees can damage wood framing, often out of sight until the damage is done.

    Paint and siding upkeep

    Wood siding needs regular painting or staining to keep moisture out. Shingle roofs wear out and need replacing over time.

    Warping and settling

    Lumber shrinks, twists, and moves with the seasons. That can lead to sticking doors and cracks.

    What wears out a metal garage

    Steel has its own enemies, and it’s only fair to point them out.

    Rust

    Scratches, standing water, and damaged coatings can let rust start. Keep an eye on panels and touch up scratches.

    Condensation

    Without the right insulation and ventilation, steel buildings can sweat on the inside. That can lead to rust on stored items. Our post on insulation options covers how to deal with it.

    Loose fasteners

    Over time, check screws and fasteners and replace any that have worked loose or lost their seal.

    The good news is that steel doesn’t rot, warp, or feed termites, which are the problems that do the most damage to wood garages.

    Durability in storms

    Both can be built to handle wind and snow, but it depends on how they’re designed and built. Our steel buildings are certified for local wind and snow loads, with engineered drawings available. The vertical roof, which about 80% of our customers choose, sheds rain and snow instead of letting it sit. Read more in our post on wind and snow load ratings.

    Fire

    Steel framing and panels don’t burn like a wood frame does. That’s worth thinking about if you’ll be welding, running heaters, or storing fuel.

    Build time

    A wood garage is framed and finished on site, which takes a crew a good bit of time, and weather can stretch it out. A steel building’s parts are made ahead of time, so once the site and foundation are ready, the install goes quickly.

    Looks

    Some people prefer the look of a wood garage to match their house. Steel buildings come in a range of colors and roof styles, and options like wainscot and boxed-eave or vertical roofs give them a more finished look.

    Quick comparison

    Steel garageWood garage
    RotNoYes, over time
    Termites and pestsNoYes
    FireFrame does not burnFrame can burn
    Main upkeepWatch for rust, check fastenersPaint, roof, rot and pest repairs
    InstallQuick once site is readyFramed on site, takes longer
    Wind and snowCertified for local loadsDepends on builder

    Cost

    Costs depend on size, finishes, site prep, foundation, and your local market, so we won’t put numbers on it here. The best comparison is a quote for the same size, height, and doors from both. Think about long-term upkeep too, not just the day-one price. See what affects the price of a metal building.

    So which lasts longer?

    With basic care, a steel garage avoids the biggest problems that wear down wood: rot, termites, and warping. A wood garage can last a long time too, but it usually needs more regular upkeep to get there.

    If you want a garage that goes up quickly and doesn’t need painting, take a look at our metal buildings. Enclosed garages also qualify for our rent-to-own program.

    Call or text John at 276-235-1191, or start a quote with the quote builder. We’ll quote it.

    Common Questions

    Does a metal garage last longer than a wood garage?

    A steel garage avoids rot, termites, and warping, which are the biggest causes of wear on wood garages. With basic care, it holds up well with less upkeep.

    What maintenance does a metal garage need?

    Watch for scratches and rust, keep water from sitting against panels, check fasteners, and control condensation with insulation and ventilation.

    Is a metal garage faster to build?

    Usually. The parts are made ahead of time, so once the site and foundation are ready, the install goes quickly.

    Can I finance a metal garage?

    Enclosed garages qualify for our rent-to-own program. Open carports are not eligible.

    Ready to price your building?

    Call or text 276-235-1191, or send us the size, location and what it is for. We will come back with a real number.

    Build & Get a Quote Text Us

  • Metal Building vs Pole Barn: Cost and Lifespan Considerations

    Metal Building vs Pole Barn: Cost and Lifespan Considerations

    If you’re putting up a barn, shop, or equipment building, you’ll probably weigh a steel building against a pole barn. Both are common in the country for good reason. But they’re built differently, and that affects how they hold up over the years.

    Here’s an honest comparison.

    How each one is built

    Pole barn

    A pole barn uses wood posts set in the ground (or on piers), with wood framing and usually metal panels for the roof and siding. The posts carry the load. It’s sometimes called post-frame construction.

    Steel building

    A steel building uses a steel frame with steel roof and wall panels. The frame is anchored to a concrete slab, footers, or the ground, depending on the building and use. Everything that carries the load is steel.

    So the big difference is the frame: wood vs steel. Many pole barns have metal siding, which is why people sometimes mix them up.

    Upfront cost

    Prices change with the market and depend a lot on size, height, options, site prep, and foundation, so we won’t throw out numbers here. In general:

    • Both can be cost-effective ways to cover a lot of space
    • Pole barns often need a builder to frame the structure on site, which adds labor
    • Steel buildings arrive as manufactured parts and go up quickly once the site is ready
    • Concrete, if you want a floor, adds to either one

    The best way to compare is to get quotes for the same size, height, doors, and foundation from both. See our post on what affects the price of a metal building.

    Lifespan and long-term upkeep

    This is where the frame material really matters.

    Rot and moisture

    Wood posts in or near the ground are exposed to moisture year after year. Even treated posts can break down over time, especially in wet soil. A rotting post can weaken the whole structure. Steel frames don’t rot.

    Termites and pests

    Wood framing can attract termites, carpenter bees, and other pests. Steel doesn’t give them anything to eat.

    Warping and settling

    Wood can twist, shrink, and warp as it dries and as seasons change. That can throw doors and walls out of line. Steel holds its shape.

    Fire

    Steel does not burn the way wood framing does. That’s worth thinking about if you’re storing fuel, hay, or equipment.

    Rust

    Steel’s enemy is rust. Good coatings, proper anchoring, a vapor barrier, and controlling condensation all help. Keep an eye on spots where water sits or where panels get scratched.

    Strength and certification

    Both can be built for local wind and snow loads, but you’ll want to confirm that either way. Our steel buildings are certified for local wind and snow loads, with engineered drawings available for your permit. Ask any pole barn builder the same questions. Your county building office can tell you what loads apply to your property.

    Foundations

    Pole barn posts are usually set in holes in the ground, and the floor, if there is one, is often added later. A steel building can be set on a concrete slab with footers poured below the local frost depth, which gives you a solid, flat floor from day one. Concrete is quoted separately from the building. Learn more on our concrete foundations page.

    Adding on later

    Both types can be extended, but it is almost always easier and cheaper to build the size you need the first time. Think about what you will store in five or ten years, not just today.

    Open space inside

    Steel framing can span wide openings, which gives you open floor space for equipment and vehicles. Pole barns rely on posts, which can limit layout depending on the design.

    Quick comparison

    Steel buildingPole barn
    FrameSteelWood posts and framing
    RotNoPossible, especially at ground level
    TermitesNoPossible
    FireFrame does not burnWood frame can burn
    Main upkeep concernRust and condensationRot, pests, warping
    CertificationCertified for local loadsDepends on builder

    Which one is right for you?

    A pole barn might suit you if you like wood construction and have a builder you trust. A steel building is a strong choice if you want a frame that won’t rot, warp, or attract pests, and you want something certified for your local wind and snow loads.

    With our turnkey service, one company handles the site review, site prep, footers, slab, and building install. See our metal buildings, including barns and ag buildings, or check the gallery.

    Call or text John at 276-235-1191, or start with the quote builder. We’ll quote it so you can compare.

    Common Questions

    What is the difference between a pole barn and a metal building?

    A pole barn uses a wood post frame, often with metal siding. A metal building uses a steel frame with steel panels.

    Which lasts longer, a pole barn or a steel building?

    A steel frame does not rot, warp, or attract termites, which are the main long-term problems with wood posts. Steel needs protection from rust and condensation.

    Is a pole barn cheaper than a steel building?

    It depends on size, options, site, and foundation. Get quotes for the same size and features from both to compare fairly.

    Can a steel building be used as a barn?

    Yes. Barns and agricultural buildings are some of the most common steel buildings we install.

    Ready to price your building?

    Call or text 276-235-1191, or send us the size, location and what it is for. We will come back with a real number.

    Build & Get a Quote Text Us

  • Roll-Up Doors vs Walk-In Doors: Sizing and Placement Tips

    Roll-Up Doors vs Walk-In Doors: Sizing and Placement Tips

    People spend a lot of time picking the size and color of a metal building, then add doors almost as an afterthought. That’s backwards. Doors are how you use the building every day. Get them wrong, and you’ll be squeezing a truck through a tight opening or walking around the whole building to grab a rake.

    Here’s how to think through door choices before you order.

    Roll-up doors

    Roll-up doors roll up into a coil above the opening. They’re the main way vehicles, equipment, and big items get in and out.

    Why people like them:

    • They don’t swing out, so they don’t take up driveway or floor space
    • They come in a wide range of sizes for cars, trucks, RVs, and equipment
    • They’re simple and durable

    Things to consider: Roll-up doors need headroom above the opening for the coil. A taller door may mean taller walls. Wider and taller doors cost more.

    Walk-in doors

    Walk-in doors are regular, person-sized entry doors. They let you get in and out without opening a big roll-up door.

    Why they matter:

    • Quick access without letting out heat or letting in weather
    • Better security, since you can keep the big door closed
    • An extra exit, which is important in a workshop

    Most enclosed buildings benefit from at least one walk-in door. If you’ll work in the building, it’s hard to imagine going without one.

    How to size a roll-up door

    Measure what will go through it, then add room to spare.

    Width

    Measure the widest vehicle or equipment, including mirrors. Then add room on each side so you’re not threading a needle every time you pull in. A slightly wider door makes daily use much easier, especially when backing a trailer.

    Height

    Measure the tallest vehicle with everything on it: roof racks, ladders, AC units, antennas, light bars, or a loader on a tractor. Add clearance. If you plan to buy a taller vehicle someday, size for that one.

    Remember: Door height affects wall height. If you need a tall door for an RV or camper, the building’s walls need to be tall enough to fit the door and the coil above it. See our post on picking the right size.

    Placement tips

    Put doors where you’ll actually drive

    Look at your driveway and how you’ll approach the building. You want to pull straight in without tight turns. Think about turning room for a trailer, too.

    Mind the roof

    Where the roof sheds water and snow matters. On a vertical roof, which about 80% of our customers choose, water and snow run down the sides from the peak to the eave. A door on the sidewall may sit right where all that comes off. Doors on the end walls (gable ends) usually stay clear of roof runoff.

    Face away from the weather if you can

    If your area gets strong wind from one direction, try to place large doors on a sheltered side. Big doors facing straight into the wind take a beating.

    Leave room on the walls

    Every door takes away wall space you could use for shelves, benches, or storage. Plan your interior layout before you place doors.

    Walk-in door location

    Put the walk-in door where you’ll come from most often, like the side facing the house. In a workshop, think about a second exit. Keep it away from where vehicles park so it doesn’t get blocked.

    Windows

    Windows let in light and air, which helps with condensation and makes a workshop more pleasant. They also take wall space and need to be placed so they don’t end up behind shelves.

    Quick comparison

    Roll-up doorWalk-in door
    Main useVehicles, equipment, large itemsPeople
    Space neededHeadroom above for the coilSwing space inside or out
    SecurityGood when closedLockable, convenient daily access
    Best locationWhere you drive in, often an end wallWhere you walk from most

    Frame-outs

    A frame-out is an opening framed into the wall for a door you’ll buy and install later, like an insulated overhead garage door. It’s an option if you have something specific in mind.

    Doors and certification

    Large openings affect how a building handles wind. Certified buildings are engineered for your local wind and snow loads, and door size and placement are part of that. Read more in our post on wind and snow load ratings.

    Lay it out with us

    Try different door layouts in our quote builder, or talk it through with us.

    Call or text John at 276-235-1191, or send us a note through the contact form. We’ll help you place the doors and quote it.

    Common Questions

    Do I need a walk-in door if I have a roll-up door?

    It is a good idea. A walk-in door lets you get in and out without opening the big door, keeps weather out, and gives you a second exit in a workshop.

    How tall should my roll-up door be?

    Measure your tallest vehicle with everything on it, including racks, AC units, or loaders, then add clearance. Taller doors may need taller walls.

    Where should I put roll-up doors on a vertical roof building?

    End walls usually stay clear of roof runoff. Doors on sidewalls can sit right where rain and snow slide off the roof.

    What is a frame-out?

    A frame-out is an opening framed into the wall for a door you buy and install yourself later.

    Ready to price your building?

    Call or text 276-235-1191, or send us the size, location and what it is for. We will come back with a real number.

    Build & Get a Quote Text Us

  • Insulation Options for Metal Buildings: When It’s Worth It

    Insulation Options for Metal Buildings: When It’s Worth It

    Steel is strong, but it isn’t a great insulator. On a hot day, an uninsulated metal building can feel like an oven. On a cold morning, the roof can drip water like it’s raining inside. Whether insulation is worth it depends on how you use the building and what you store in it.

    Here’s a straightforward look at your options.

    Condensation: the problem most people don’t expect

    Condensation is the number one reason people insulate metal buildings, even ones they don’t heat or cool.

    Here’s how it happens. Warm air holds moisture. When that warm, moist air touches a cold surface, like a steel roof panel on a cool night, the moisture turns to water droplets. That’s the same thing that happens on the outside of a cold glass of iced tea in the summer.

    In a metal building, those droplets form on the underside of the roof and walls, then drip onto whatever is below. Over time, that can lead to:

    • Rust on tools, equipment, and vehicles
    • Mold and mildew on stored items
    • Water spots and puddles on the floor
    • Damage to hay, feed, or anything that needs to stay dry

    Insulation helps by putting a barrier between the warm inside air and the cold steel. A vapor barrier under the slab also helps by keeping ground moisture from coming up into the building. Good airflow helps, too.

    When insulation is worth it

    Insulation usually makes sense if:

    • You plan to heat or cool the building
    • You’ll spend time working in it
    • You store tools, vehicles, or anything that can rust
    • You store hay, feed, or items that can mold
    • It’s a barndominium or other living space
    • You want to cut down on noise from rain on the roof

    It may matter less for an open carport, or a barn that’s mostly open and well ventilated. Open carports can’t really be insulated in a useful way since air moves freely through them.

    The main types of insulation

    Blanket (fiberglass) insulation

    Blanket insulation comes in rolls, usually with a facing on one side that acts as a vapor barrier. It’s often installed between the frame and the panels as the building goes up. It helps with both temperature and condensation and is one of the most common choices for metal buildings.

    Things to know: The facing needs to be sealed well at seams to work as a vapor barrier. Installing it during construction is much easier than adding it later.

    Spray foam

    Spray foam is sprayed directly onto the inside of the panels, where it expands and sticks. It seals gaps and air leaks very well, and it bonds to the steel, which helps stop condensation right at the surface.

    Things to know: Spray foam usually costs more and is applied by a specialty installer. It’s a popular choice for heated shops and living spaces.

    Reflective insulation (radiant barrier)

    Reflective insulation is usually a foil-faced material, sometimes with a bubble or foam core. It works by reflecting radiant heat, which is the heat you feel coming off a sunny roof. It can also act as a condensation barrier when installed properly.

    Things to know: It is great at blocking radiant heat in summer but adds less resistance to heat loss in winter than thicker insulation. It’s often used in garages and storage buildings where the main goal is to control condensation and keep summer heat down.

    Quick comparison

    TypeBest forThings to consider
    Blanket (fiberglass)General use, temperature and condensation controlEasiest to install during construction
    Spray foamHeated shops, living space, air sealingUsually costs more, specialty installer
    ReflectiveSummer heat and condensation in garages and storageLess help with winter heat loss

    Plan it before the building goes up

    The best time to decide on insulation is before the building is ordered. Some insulation is installed between the frame and panels during construction, and adding it later can be harder. If you plan to finish the inside with walls, think about where wiring and outlets go, too.

    Also think about the roof. A vertical roof sheds water and snow best, and it’s what about 80% of our customers choose. Insulation and roof style work together to keep the building dry.

    Ventilation matters too

    Insulation works best with good airflow. Vents, windows, and ridge vents help moist air escape. If you’ll be running heaters, working with water, or parking wet vehicles inside, ventilation is especially important.

    Get the right setup for your building

    Every building and use is different. Tell us how you’ll use yours, and we’ll talk through which options make sense. See the buildings we offer on our metal buildings page, or look up terms in our glossary.

    Call or text John at 276-235-1191, or start a quote with the quote builder. We’ll quote it with the options you need.

    Common Questions

    Why does my metal building drip water inside?

    That is condensation. Warm, moist air hits cold steel and turns to water droplets. Insulation, a vapor barrier under the slab, and good ventilation all help.

    Do I need insulation if I don’t heat my building?

    Often yes. Insulation helps control condensation, which can rust tools and vehicles and cause mold, even in buildings that are not heated.

    What is the best insulation for a metal building?

    It depends on use. Blanket insulation is a common all-around choice, spray foam is popular for heated shops and living space, and reflective insulation helps with summer heat and condensation.

    Can I add insulation after the building is up?

    Sometimes, but some types are much easier to install during construction. It is best to decide before the building is ordered.

    Ready to price your building?

    Call or text 276-235-1191, or send us the size, location and what it is for. We will come back with a real number.

    Build & Get a Quote Text Us

  • Lock Your Price Now: Why Steel Prices Keep Climbing

    Lock Your Price Now: Why Steel Prices Keep Climbing

    If you have been watching metal building prices for a while, you’ve probably noticed they don’t sit still. The quote you got last year may not match what the same building costs now. That isn’t a sales trick. It comes down to what goes into making and delivering a steel building.

    Here’s why prices keep moving, and how you can lock yours in.

    What drives metal building prices

    Steel

    Steel is the biggest part of a metal building. When steel costs go up at the mill, manufacturers pay more for framing tubing and panels, and those costs work their way into building prices.

    Diesel and fuel

    Steel has to be hauled from the mill to the manufacturer, and the finished building has to be hauled to your site. Crews drive to the job. Equipment for site prep and concrete runs on fuel. When diesel and fuel prices climb, every step of the job costs more.

    Demand

    Spring and summer are busy seasons. When demand is high, manufacturer schedules fill up and prices tend to firm up, too.

    Why waiting can cost you

    A lot of folks plan to buy “in the spring” when the weather turns. The problem is, so does everyone else. If prices go up over the winter, the building you want could cost more by the time you’re ready to order. And when spring hits, you’re also competing for spots on the schedule.

    How our price lock works

    A 15% deposit locks your quoted building price until spring. That’s it. You pick your building, we quote it, and your deposit holds that price while costs keep moving.

    • You lock in today’s quote on the building, even if steel, diesel, or fuel costs go up
    • You get ahead of the spring rush instead of starting from scratch when everyone else calls
    • You have time to plan your site, permits, and foundation over the winter

    The price lock applies to the quoted building price. Concrete is quoted separately from the building.

    What a price lock is not

    A price lock is not a reason to rush. If you are not sure about size, doors, or roof style yet, take the time to get it right first. Changing a building after you order can slow things down and change the quote. The lock is there to protect a decision you have already made, not to push you into one.

    It also helps to have the foundation conversation early. Concrete is quoted separately, and knowing what your site needs gives you a full picture of the project before spring.

    Use the winter to get ready

    Locking your price now gives you time to handle the parts of the project that can slow things down:

    • Permits: Call your county building office and find out what they require. Engineered drawings are available for our certified buildings.
    • Site planning: Decide where the building goes and what site prep it might need. See our post on preparing your site.
    • Foundation: Talk through slab size and any special needs, like a car lift or heavy equipment.
    • Layout: Finalize doors, windows, and options so there are no changes later.

    Before you lock, get the design right

    A price lock works best when you’re sure about what you want. Take some time with the size and options before you put down a deposit:

    • Use our size guide to make sure the building fits what you’ll store
    • Pick a roof style. The vertical roof is about 80% of what we sell because it sheds rain and snow best
    • Think about how many doors and windows you’ll need and where they go
    • Confirm your county’s wind and snow load and permit requirements

    What about rent-to-own?

    If you plan to use our rent-to-own program, ask us how it fits with your timing. Rent-to-own is 15% down, with monthly payments about 25% lower than typical rent-to-own programs, and 90 days same as cash from delivery. Enclosed buildings qualify; open carports are not eligible.

    Why buy from someone who’s been around

    We’ve been in the metal building industry since its early days, and we work with 4 carefully vetted manufacturers after cutting ties with 53 others over quality and integrity concerns. When we lock your price, you know who you’re dealing with. Learn more about us.

    Ready to lock your price?

    Call or text John at 276-235-1191, or build your quote with the quote builder. We’ll quote it, and a 15% deposit holds that building price until spring.

    Common Questions

    How does the price lock work?

    A 15% deposit locks your quoted building price until spring, even if steel, diesel, or fuel costs go up in the meantime.

    Does the price lock cover concrete?

    The lock applies to the quoted building price. Concrete is quoted separately from the building.

    Why do metal building prices keep going up?

    Steel, diesel, and fuel costs drive the price of making, hauling, and installing a building. When those go up, building prices follow.

    What should I do while my price is locked?

    Use the time to handle permits, plan your site, and finalize your layout so you are ready when it is time to build.

    Ready to price your building?

    Call or text 276-235-1191, or send us the size, location and what it is for. We will come back with a real number.

    Build & Get a Quote Text Us

  • Carport vs Enclosed Garage: What to Know Before You Buy

    Carport vs Enclosed Garage: What to Know Before You Buy

    Carports and enclosed garages can look alike from a distance. Same steel frame, same roof styles. But they do very different jobs. One is a roof over your vehicle. The other is a building you can lock.

    Here’s what to weigh before you decide.

    What a carport is

    A carport is a roof on legs, open on the sides. Some have partial walls or one closed side, but they are mostly open. They protect from sun, rain, hail, and snow falling straight down. They’re quick to install and cost less than an enclosed building of the same size.

    Carports work well for:

    • Covering vehicles you use every day
    • RV and boat covers
    • Shade over equipment or a work area
    • Covered parking next to a house or shop

    What an enclosed garage is

    An enclosed garage has walls on all sides, roll-up doors, and usually a walk-in door and windows. It protects from weather coming from every direction, keeps out animals and dust, and can be locked.

    Enclosed garages work well for:

    • Storing vehicles long term
    • Keeping tools and equipment secure
    • Workshops and hobby space
    • Anything you want out of sight and out of the weather

    Side-by-side comparison

    CarportEnclosed garage
    Weather protectionOverhead onlyAll sides
    SecurityLowLockable
    CostLowerHigher
    Insulation possibleNoYes
    Use as workshopLimitedYes
    Rent-to-own eligibleNoYes

    Weather: it does not just fall straight down

    Rain blows sideways in a storm. Snow drifts. Leaves, pollen, and dust settle on everything. A carport keeps the worst off the roof and hood, but vehicles still get wet and dirty from the sides. If you want your truck, tractor, or classic car truly protected, an enclosed building does that job far better.

    Security

    An open carport keeps things dry, but anyone walking by can see and reach what’s under it. Tools, mowers, and trailers are easy targets. If you’re storing anything valuable, an enclosed garage you can lock is the safer bet.

    Wind and certification

    Both carports and garages need to be anchored properly and built for the wind and snow loads in your area. Open structures catch wind differently than enclosed ones, so the design and anchors matter. Our buildings are certified for local wind and snow loads, with engineered drawings available. Read more in our post on wind and snow load ratings.

    Foundations

    Some carports can go on gravel or ground with the right anchors. An enclosed garage you plan to work in or park on long term usually does best on a concrete slab with footers poured below the local frost depth. Concrete is quoted separately from the building. See our concrete foundations page.

    Financing: an important difference

    This one matters if you’re planning to finance. Open carports are not eligible for our rent-to-own program. That means no rent-to-own and no discount on open carports.

    Enclosed buildings do qualify. Our rent-to-own program works like this:

    • 15% down
    • Monthly payments about 25% lower than typical rent-to-own programs
    • 90 days same as cash from delivery (the clock starts at physical delivery)

    If financing is a big part of your decision, that alone may point you toward an enclosed building.

    Can you enclose a carport later?

    Sometimes, but it’s often more trouble than it’s worth. Adding walls and doors later means more panels, framing changes, and possibly different anchoring or certification. If you think you’ll want it enclosed down the road, it usually makes more sense to buy it enclosed from the start.

    Think about how you will use it in five years

    A carport can be the right answer today and the wrong one later. If there is a chance you will want a shop, a place to store a project car, or locked storage down the road, factor that into the decision now.

    A middle ground

    If you want more protection than a carport without fully closing it in, partial walls, a closed gable end, or a closed side facing the weather can help. A lean-to off an enclosed building is another way to get covered parking next to locked storage.

    So which one is right?

    Go with a carport if you need simple overhead cover and are paying cash. Go with an enclosed garage if you want security, protection from all sides, workshop space, or if you want to use rent-to-own.

    Browse building types on our metal buildings page.

    Call or text John at 276-235-1191, or start a quote with the quote builder. We’ll quote it either way.

    Common Questions

    Can I get a carport through rent-to-own?

    No. Open carports are not eligible for our rent-to-own program, and there is no discount on them. Enclosed buildings do qualify.

    Is a carport cheaper than an enclosed garage?

    Yes, an open carport costs less than an enclosed garage of the same size because it uses fewer panels and less framing.

    Can I enclose my carport later?

    Sometimes, but it often costs more than buying it enclosed from the start because of added framing, panels, and possible anchoring changes.

    Does a carport need a concrete slab?

    Not always. Some carports go on gravel or ground with the right anchors. Enclosed garages for long-term use usually do best on a slab.

    Ready to price your building?

    Call or text 276-235-1191, or send us the size, location and what it is for. We will come back with a real number.

    Build & Get a Quote Text Us

  • Barndominium Shells: What’s Included and What Isn’t

    Barndominium Shells: What’s Included and What Isn’t

    Barndominiums have gotten popular for good reason. A steel shell gives you a strong, open structure you can lay out however you want inside. But there is a lot of confusion about what a “shell” actually is. Some folks expect a finished house. A shell is not that.

    Here is a straight answer on what a barndominium shell usually includes, what it doesn’t, and what you need to plan for.

    What a barndo shell is

    A barndominium shell is the outside structure: the steel frame, roof, and walls, set on a foundation. It keeps the weather out and gives you a big, open space. Everything that makes it a home, like rooms, plumbing, wiring, and finishes, comes after.

    Think of it as the bones and the skin of the building. You or your builder handle the inside.

    What is typically included

    Every quote is different, so always check yours line by line. But a barndo shell project usually covers:

    • The steel building: frame, roof, and wall panels, in the size, height, and roof style you choose
    • Openings you order: roll-up doors, walk-in doors, windows, or framed openings, based on your design
    • Certification: engineered for your local wind and snow loads, with engineered drawings available
    • Delivery and install: delivered, set, anchored, and checked before the crew leaves

    With our turnkey service, we can also handle the site review, site prep, footers, and slab, so the foundation and shell are planned together. Concrete is quoted separately from the building.

    What is usually not included

    This is the part that catches people off guard. A shell typically does not include:

    • Interior framing for walls and rooms
    • Plumbing, water lines, and fixtures
    • Electrical wiring, panels, and lighting
    • Heating and air conditioning
    • Interior insulation and wall finishes
    • Drywall, flooring, cabinets, and trim
    • Septic system or sewer connection
    • Well or water service hookup
    • Driveways, porches, and landscaping

    Some of these may be available as add-ons. Others you’ll handle with a general contractor or trade subs. We’ll be clear about what your quote covers.

    Plan the inside before you order the shell

    The biggest mistake with barndos is ordering the shell first and figuring out the floor plan later. A few things need to be decided early:

    Door and window placement

    Windows and doors are cut into the shell. Moving them later is hard. Lay out your rooms first, then place openings where they make sense for light, views, and access.

    Plumbing in the slab

    If your plumbing runs under the floor, it has to be roughed in before the slab is poured. That means your bathroom and kitchen locations need to be final before concrete day.

    Ceiling height and lofts

    If you want a loft or a second floor, you need enough wall height, and the structure needs to be designed for it. Tell us early.

    Insulation

    Steel buildings that people live in need good insulation to control temperature and condensation. Plan for it from the start. Our post on insulation options for metal buildings covers the basics.

    Permits for living space

    A building you live in usually faces stricter rules than a garage or barn. Your county may require engineered drawings, an engineered foundation, inspections at several stages, and residential code compliance for the interior. Call your county building office before you start, and ask what they need for a residential steel building.

    Financing

    Financing a home is different from financing a garage, and options vary. If you plan to finance, talk to your lender early about what they need from a steel-shell project.

    Shell vs finished home: quick look

    ItemShellFinished barndo
    Steel frame, roof, wallsYesYes
    Doors and windows you orderYesYes
    FoundationQuoted separatelyYes
    Interior wallsNoYes
    Plumbing, electric, HVACNoYes
    Insulation and finishesUsually notYes

    Is a barndo shell right for you?

    A shell is a great fit if you want a strong, open structure and plan to finish the inside yourself or with your own contractor. It gives you control over the layout and finishes. Just go in knowing that the shell is the start of the project, not the end.

    See the types of buildings we offer on our metal buildings page, or check the gallery for ideas.

    Call or text John at 276-235-1191, or start with the quote builder. Tell us about your floor plan and we’ll quote the shell and foundation.

    Common Questions

    What does a barndominium shell include?

    Typically the steel frame, roof, wall panels, the doors and windows you order, certification for local loads, and delivery and install. Always check your quote line by line.

    Is the foundation included with a barndo shell?

    Concrete is quoted separately from the building. With our turnkey service we can handle site prep, footers, and the slab along with the shell.

    What is not included in a shell?

    Usually interior framing, plumbing, electrical, HVAC, insulation and finishes, septic, well hookup, and driveways.

    Do I need a permit for a barndominium?

    Most likely. Living space usually faces stricter rules than a garage. Check with your county building office before you start.

    Ready to price your building?

    Call or text 276-235-1191, or send us the size, location and what it is for. We will come back with a real number.

    Build & Get a Quote Text Us